
Monday, April 30, 2018

Sunday, April 29, 2018
Chainsaw Sharpening Tips
 Holy Cow, it has been seven years since I posted this one, and it is still worth reading. I will be doing chainsaw work in the days and weeks ahead and moving new wood into the barn for next winter. Back To The Old Grind!
This ad was in a little farm newspaper that we get in our mail every week, and I think it is safe to assume that many chainsaw owners believe the statement that chains can be sharpened "4-5 times," and that they are willing to pay $10.00 to have a chain sharpened for a twenty inch bar. That is a pretty good gig if you can get it, but when you figure that the saw owner is going to be paying $50 to sharpen a $15 dollar chain into oblivion, and will be cutting with a dull saw most of the time, it makes me cringe. When you buy a couple new chains for your saw, buy a box of files, a sharpening jig that will work on your saw, and take the time to learn how to sharpen. It's easy, and we will go over the basics for you.
 Out in front on each tooth is the depth gauge. You will hear it called the raker, but it's real purpose is to control the thickness of wood that the tooth can bite. As you file the tooth back the depth gauge must also be filed down to match it. You don't have to file the depth gauges every time you sharpen, and I do them only on the workbench, not in the woods. The parts of your tooth that you work with as you file are the depth gauge, the top plate, the side plate, the top angle, and the side angle. As you look at the teeth above, mentally draw a line 90 degrees down from the front edge of the top plate. That line should evenly intersect the arc on the front of the side plate. If the arc is hooked forward the tooth will bite more aggressively, and if the arc is leaning back the tooth will not bite hard enough. When the side angle is correct, the angle of the edge under the front of the top plate will be very close to 45 degrees.
You can see that the third tooth in the photo above is filed so the tooth will be lazy. This can be straightened out with a filing jig, or by providing a little downward pressure in the gullet as you file freehand.
 I believe in filing every time I fill the fuel and oil tanks on my saw. These teeth have cut through one filling, and you can see a little bright edge on both teeth, plus an obvious bright spot on one tooth. This is how you know whether your chain is sharp or dull. The top should disappear at the front edge with no bright spots or edge. Usually you will be able to find some bright edges after each tank of fuel, so a fillup is a chance to keep your saw sharp.
 Point the teeth into the light, put on your reading glasses, and the need to file becomes obvious.
 Adjust the slack out of your chain, block up the bar and look for the dullest tooth. Check the gullet on the sideplate to see if you should press straight back, or slightly up or down, and push your file through with a straight stroke at the 25 to 35 degree angle of the front edge of the top plate. Use a file handle so you can make strokes the entire length of the file, and count the strokes needed to remove all of the bright edge. Advance the chain and repeat all of the way around the chain, then turn your saw around and do the other side.
 The Carlton File-O-Plate is an easy jig to use to correct your angles if you use Carlton or Woodland Pro chain. It keeps your file at the right depth, and shows you the correct angle for the top plate.
 This little tool is hard enough that files barely mark it, and you can use one for years. I usually file freehand in the woods because I am afraid of losing it, but I use it at home to straighten things out.
 Look closely and you can see a depth gauge peeking up through the little slot. I like to file the depth gauges after I have rehabbed the saw at the end of the day, and the File-O-Plate system seems to set them right for cutting oaks and hickories.
 This little gizmo is common in lots of chainsaw departments. I picked this one up at Lowe's in a Husqvarna blister pack, and the chains hanging nearby were Oregons. I set it on my Carlton chain, and it held the file a bit high. The good news here is that the slots can be filed a bit deeper so the rollers will hold the file in the sweet spot for you. This tool also has a gauge for filing your depth gauges, with two choices for the type of trees you are cutting. This is an easy tool to use, and most people who try it like it.
 I think this little stamped guide is sold in every saw shop in the country, and it's not a bad tool to have in your kit. It shows you the correct angle for the front of the top plate, but it is not hard metal, so you have to be mindful of your side angle, and aim your pressure appropriately. If you bear downward, you will soon have the slot deepened, and you will be filing your gullets too low, making the teeth bite too aggressively.
 This file guide has two slots for filing your depth gauges; one is .030", and the other is .035".
Use the right one for your chain and the type of wood you are cutting. I tried the .035" slot on my saw with a .325 chain, and it made the teeth too grabby to use in hickory. It still worked OK in oak, but that was a good lesson about pushing the limits. The .035" works fine on my saws with .375 chains.
 The end of this tool is very useful for cleaning sawdust and gunk out of the rail on you saw's bar, so whether you sharpen with this jig or not, you will want to have one in your kit.
 Once you understand what the tooth needs, you will be able to file freehand at every fillup so you always have a sharp saw. If you tag a rock, or other hard object, stop the saw right then and inspect every tooth. You may only have one or two dull ones, and you can fix it right then so you keep throwing chips instead of sawdust. Now, let's watch a logger touch up his saw during a fuel break. There is a mildly amusing story told by the skidder driver, so turn up the volume.
Today Is A Beautiful Day!


Proverbs 20:4 The sluggard will not plow by reason of the cold; therefore shall he beg in harvest, and have nothing."
Friday, April 27, 2018
Weekend Steam: Fowler's Ghost
This is an odd one! The greatest danger is that you could not dump the heat source, since it was a quantity of hot fire bricks. It is all very interesting, and the narrator does a fine job of telling the story. Many Thanks to Merle, our great video spotter!
Thursday, April 26, 2018
Tiling Has Changed A Bit In 100 Years
There have been big doins in our neighborhood. Several fields were tiled during the winter, and this one is in a good place to shoot a little video. They started laying the first pass and gave up because of field conditions more than a month ago. They are back and laying tile like crazy. We were lucky to drive by and get some videos and photos.
It is a far cry from the old days. I remember a Buckeye Ditcher at our farm in Iowa during the 1950's. It was more modern than the one in the following video, but it did the same thing. Tile had to be laid by hand and then covered over. Earlier machines than this one had a one-lung engine! I saw one of those sitting in front of Southeastern Illinois College near Harrisburg many years ago. There is another like it on display at Mt. Pleasant, Iowa. Prior to that, tile was laid by digging the trenches by hand. There probably were no 8 hour days for the diggers.
It is a far cry from the old days. I remember a Buckeye Ditcher at our farm in Iowa during the 1950's. It was more modern than the one in the following video, but it did the same thing. Tile had to be laid by hand and then covered over. Earlier machines than this one had a one-lung engine! I saw one of those sitting in front of Southeastern Illinois College near Harrisburg many years ago. There is another like it on display at Mt. Pleasant, Iowa. Prior to that, tile was laid by digging the trenches by hand. There probably were no 8 hour days for the diggers.
Kudos To Hi-Point!
Just how good is the lifetime warranty on Hi-Point firearms? Cody Anderson, of Southern Illinois can tell you about it. His home was destroyed by a tornado in early April (Link To WSILTV3 report). (Link To WSILTV3 report #2 with Cody's Father) Here are Cody's pictures he posted to Hi-Point on their Facebook page.


I think Mr. Anderson was kidding when he asked if they would replace his Carbine, but Hi-Point demonstrated once again that they are a first-class outfit. Hi-Point products are affordable, dependable, made by Americans, and they are backed by a good warranty administered by great people.
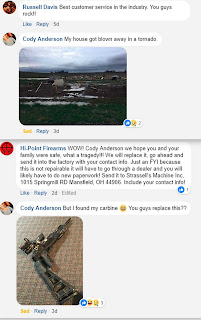
Photo Credit, Cody Anderson, used with permission. Thank You, Cody!


I think Mr. Anderson was kidding when he asked if they would replace his Carbine, but Hi-Point demonstrated once again that they are a first-class outfit. Hi-Point products are affordable, dependable, made by Americans, and they are backed by a good warranty administered by great people.

Photo Credit, Cody Anderson, used with permission. Thank You, Cody!
Wednesday, April 25, 2018
Old Man Motor Sports Part 2
We bought this Ariens tiller in 1980 and used it for many years. It came with a Tecumseh 7 HP engine, and that thing never ran well. The carburetor had to be adjusted constantly, even while you were working. I was pretty good at walking along beside it to adjust the mixture while it was under load. The old motor finally gave out and we put a new Briggs and Stratton engine on it in 2017. It is easy to use now. We should have upgraded long ago.
Tuesday, April 24, 2018
Ruger's Auction To Benefit The Scholastic Action Shooting Program

Ruger is offering a nice one this week. It is a 7 mm Magnum Mk II Express Rifle. You can kill Moose and Squirrel! Look up the ballistics on this caliber and then imagine the shots you can make with just a modicum of range estimation. This beautiful rifle will sell mid-day, Wednesday, April 25. CLICK HERE to read all about it and to place your bid. $1100
WHOA! Just a minute! A 50th Anniversary Engraved Blackhawk just showed up on Ruger's GunBroker page, and it is selling tomorrow! Here is the pic, and the LINK! Ending time right now is 1:38 PM Eastern on April 25, 2018. $780

Monday, April 23, 2018
Tuesday Torque: 6 HP Armstrong Engine (Waterloo, Iowa)
Waterloo-built engines are a subset of the gas engine collecting hobby. A rare brand is the Armstrong, and this one has its own special idiosyncrasy. The pushrod goes through the mixing valve! Pretty neat, and very unusual. This engine hopped into our friend Gary's truck the other day, and will be probably be at Pinckneyville in August.
Video by Gary Bahre
Video by Gary Bahre
Sunday, April 22, 2018
This Has Great Potential....
...for a guy who grabs a chainsaw for woodworking projects!
Back To The NEWOld Grind!
Back To The NEW
Saturday, April 21, 2018
Annual Gosling Show
Our annual goose couple has hatched five goslings successfully and we have been enjoying them the last couple days. They will stay here for a while, then march cross-country to a neighbor's pond for a week or two, return and start flying. Kids grow up so fast.


Subscribe to:
Posts (Atom)


